

Technical Help
How to download, open, scan, install and launch maps & mods found on this site.
It is assumed you are using a legal version of Steam (updated to Steampipe) and the games.
There are four sections to this page:
- Common Steps required for all types of installation.
- Specific Steps, depending on the games and type of file being installed.
- Advanced Options, like the developer console
- Special Issues, such as Steampipe.
MapTap
MapTap is a free application from RUN. THINK. SHOOT. LIVE. that allows you to find, install, uninstall and play maps and mods easily.
By using the application you can completely avoid all the instructions below.
Section One: Common Steps
Differences Between Maps & Mods Engines and Games Note About Map Saves
How to Download How to Scan How to Open
Before we starting installing and playing, let's have a quick look at the difference between a map and a mod. The word "mod" is short for modification. Essentially this means that the game is modified in some way. It could contain new content (textures, models, sounds, weapons etc), it could be the way it plays (weapons have more or less power, new moves are available etc). But the basic idea is that the game is changed somehow. However, some mods, don't have any new content.
A Mod will be supplied as a folder, which just needs to be copied to the correct location to work.
A map is simply a level that contains all the same elements as the game and just gives you the opportunity to play in a new area. A map has 1 or more files that need to be copied to different folders.
There is also a difference how a mod or map is launched, but this is discussed in the appropriate section.
Lastly, there is a difference in installation steps depending on which engine the game uses.
Don't panic! It's not as complicated as you may fear. However, if learning the difference between engines and games is not what are interested in, then please use MapTap. It will automate everything AND offers you some management features not available with manual installation.
The "engine" is the software that "runs" the game.
Half-Life, Opposing Force and Blue Shift (plus some other Valve games) use an engine called GoldSource (GoldSrc) which is a heavily modified Quake Engine.
Half-Life 2, Episode One and Episode Two (plus some other Valve games) use an engine called Source Engine.
The different engine/game requires placing the files (for both maps and mods) in different locations.
Ideally, everything would be released as mods because they are easier to install and uninstall than individual files, but when a modder makes a single, small map they rarely package it as a proper mod.
If you use the normal save system then there is no problem but if you use the quick save feature it will overwrite your last quicksave. If you are still playing the retail game it will overwrite that save. This doesn't happen with mods because the saves are part of the separate folder. The simple solution is to avoid using quick saves when playing maps unless you are not playing the retail game.
The first thing you need to do is download a map or mod. The screenshot below shows the section within a post where you can download the file for each release.
As you can see, there are two buttons to select.
The red one allows you to install directly with MapTap and requires that MapTap has been installed and run at least once.
The blue button allows you to download the file directly to your computer.

However, some older posts and larger mods do not have the MapTap download button and/or may have a differently styled button..
Whichever download button you use, you will eventually see a "Save As" dialog box.
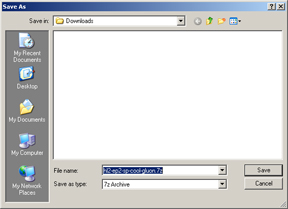
The exact appearance of the box may differ from the one you see compared to my screenshot depending you which browser and operating system you are using.
Save the file to a location of your choice.
All files are carefully scanned before being uploaded to the PlanetPhillip.com/RunThinkShootLive.com server
However, you should scan ALL files before you open them.
That is true of EVERY file you download from EVERY website.
The exact process of scanning files depends on your operating system and software. However, it should simply be a case of right clicking on the file and selecting Scan with "XYZ", where "XYZ" is the name of your antivirus software.

All the files you download from either PlanetPhillip.com or RunThinkShootLive.com have been compressed. This for a few reasons. Firstly, it puts all the files or folders into one easy-to-download file and secondly because it significantly reduces the file size, which means it downloads faster. For small files that's not very important but for larger files that are downloaded thousands of times, it's very important.
Just to complicate things there is a variety of compression (sometimes called "archive") formats. In September 2009 the site changed the format it uses to save even more space and bandwidth.
To manage compressed files Phillip uses and recommends a free application called 7zip. It opens all the file formats available from PlanetPhillip.Com and RunThinkShootLive.Com
Once you install this application it should "associate" itself with the ".7z" extension files (and probably some others, but that's your choice). That means that when you try to open a file ending in ".7z" it will open with the correct application.
At this point the instructions fork, depending on whether you are installing a map or a mod and for which game/engine.
Section Two: Specific Steps
Source Map Details Source Mod Details GoldSrc Map Details GoldSrc Mod Details
I will use a Half-Life 2 map example, but the concept applies to all Source games.
Firstly, find your Half-Life 2 folder. Mine is here:
- C:\Program Files (x86)\Steam\SteamApps\common\Half-Life 2\hl2\
but your path may be different depending on how you installed Steam and the game.
Here are the paths for Episode One and Episode Two:
- C:\Program Files (x86)\Steam\SteamApps\common\Half-Life 2\episodic\
- C:\Program Files (x86)\Steam\SteamApps\common\Half-Life 2\ep2\
Again, yours may vary, but only in the main location. From the "\Steam\" part it should be the same.
The screenshots shows the path in the explorer address bar and the folders inside. You may want to create a shortcut to the maps folder, depending on how often you want to install and play maps.

What you need to do now is copy the BSP file into the appropriate maps folder, depending on which game the map is for.
Open the relevant folder mentioned above and have the 7zip file open at the same time. The screenshot shows how Phillip likes to operate. Press (not click) the relevant .bsp file in the 7zip window with your left mouse button and drag it across to the maps folder. Let go and it will copy the file.
Please Note
The example shown is the simplest for maps. Sometimes other files are needed or included in the compressed file. The location of these files is ALWAYS detailed in the manual installation instructions on the respective map post on PlanetPhillip/RunThinkShootLive. If you have downloaded the file from another website, then please contact them for help.
One of the main differences between a proper mod (packaged as a folder) and a map or mappack is how you launch it.
To run maps you need to open and use the Developer Console. Don't worry, it's very easy.
To uninstall a source map, you need to delete the BSP file AND any other files you installed. It's that simple.
Uninstalling a map and its associated files should be part of your normal file management routine. When you install a map and are sure you won't play it again you will need to delete the files that you installed, along with some others that are created by the game.
However, even the simplest installation requires 3 files to be deleted. The screenshots show the location of a pre-Steampipe installation, but the process is the same.
Below is a screenshot of the 3 folders you will need to access.
- In the first window you can see the maps folder, with an example map highlighted (don't worry that my icons are probably different from yours). This file will need to be deleted.
- The second window shows the graphs folder. The relevant .ain file (same name as the map) will need to be deleted.
- And lastly the third windows shows the soundcache folder and again the relevant .cache file will need to be deleted.

Whilst deleting these files isn't essential for keeping your games and maps working, it will ensure your system doesn't become clogged with files you will never use.
However, using MapTap means you don't have to worry about ANY of the details. The application takes care of everything for you.
First, find your SourceMods folder. Its path should be:
C:\Program Files (x86)\Steam\SteamApps\sourcemods
Your path may be different depending on how and when Steam was installed on your system.
Next, you need to open the mod file you downloaded and scanned.
Resize the windows to suit your screen size and preference. Having two windows open at the same time make it easy.
Press (not click) the folder (no need to copy the ReadMe.txt) in the 7zip window with your left mouse button and drag it across to the SourceMods folder. Release the button and it will copy the folder.

You have just installed your first mod!
Create a shortcut to your SourceMods folder if you plan to install lots of mods (and why wouldn't you?).
Yes, it was that easy but you need to start or restart Steam for it to appear in your "Library" tab. If you don't restart Steam you won't see it.
There are three main ways to launch a mod:
- 1. Double clicking it (from the list in your "Library" tab in Steam.
- 2. Selecting it from the list in your "Library" tab and clicking Launch.
- 3. By creating a shortcut to the mod and double clicking that.

Clearly, creating a shortcut is not worth it for a short mod or a mod you only play once but for long mods it might be.
To create a shortcut, right click the mod in your "Library" tab and select Create Shortcut.
Some useful tips on launching mods will be discussed in the Advanced section.
Delete the folder you copied into the SourceMods folder.
Please note: whichever method you use, you will lose all the screenshots and saves for that mod.
I will use a Half-Life map example, but the concept applies to Opposing Force too.
Firstly, find your Half-Life maps folder. Current default is here:
- C:\Program Files (x86)\Steam\SteamApps\common\Half-Life\valve\maps
but your path may be different depending on how you installed Steam and the game.
Here is the path for Opposing Force:
- C:\Program Files (x86)\Steam\SteamApps\common\Half-Life\gearbox\maps
Again, yours may vary, but only in the main location. From the "\Steam\" part it should be the same.
The screenshots shows the path in the explorer address bar and the folders inside. You may want to create a shortcut to the maps folder, depending on how often you want to install and play maps.
The screenshot below is for a Half-Life 2 installation but the process is the same for Half-Life and Opposing Force.
What you need to do now is copy the BSP file into the appropriate maps folder, depending on which game the map is for.
Open the relevant folder mentioned above and have the 7zip file open at the same time. The screenshot shows how Phillip likes to operate. Press (not click) the relevant .bsp file in the 7zip window with your left mouse button and drag it across to the maps folder. Let go and it will copy the file.
Please Note
The example shown is the simplest for maps. Sometimes other files are needed or included in the compressed file. The location of these files is ALWAYS detailed in the manual installation instructions on the respective map post on PlanetPhillip/RunThinkShootLive. If you have downloaded the file from another website, then please contact them for help.
One of the main differences between a proper mod (packaged as a folder) and a map or mappack is how you launch it.
To run maps you need to open and use the Developer Console. Don't worry, it's very easy.
To uninstall a source map, you need to delete the BSP file AND any other files you installed. It's that simple.
Uninstalling a map and its associated files should be part of your normal file management routine. When you install a map and are sure you won't play it again you will need to delete the files that you installed, along with some others that are created by the game.
Whilst deleting these files isn't essential for keeping your games and maps working, it will ensure your system doesn't become clogged with files you will never use.
However, using MapTap means you don't have to worry about ANY of the details. The application takes care of everything for you.
First, find the relevant game folder. The paths should be:
- Half-Life: C:\Program Files (x86)\Steam\SteamApps\common\Half-Life
- Opposing Force: C:\Program Files (x86)\Steam\SteamApps\common\Half-Life\gearbox
Your path may be different depending on how and when Steam was installed on your system.
Next, you need to open the mod file you downloaded and scanned.
Resize the windows to suit your screen size and preference. Having two windows open at the same time make it easy.
One window is the game folder and the other window is the open .7z file, with the GoldSrc fodler in.
Press (not click) the folder (no need to copy the ReadMe.txt) in the 7zip window with your left mouse button and drag it across to the the required game folder. Release the button and it will copy the folder.
Create a shortcut to either the Half-Life or Opposing Force folder if you plan to install lots of mods (and why wouldn't you?).
You need to start or restart Steam for it to appear in your "Library" tab. If you don't restart Steam you won't see it.
There are three main ways to launch a mod:
- 1. Double clicking it (from the list in your "Library" tab in Steam.
- 2. Selecting it from the list in your "Library" tab and clicking Launch.
- 3. By creating a shortcut to the mod and double clicking that.
Clearly, creating a shortcut is not worth it for a short mod or a mod you only play once but for long mods it might be.
To create a shortcut, right click the mod in your "Library" tab and select Create Shortcut.
Some useful tips on launching mods will be discussed in the Advanced section.
Delete the folder you copied into the game folder.
Please note: whichever method you use, you will lose all the screenshots and saves for that mod.
Section Three: Advanced Options
The Developer Console allows you to do lots of things, but this guide won't detail all of them, just those related to launching maps and mods. The first thing we need to do is enable the Console and there are a few ways to do it.
Launch the game you want to play maps in, go to:
Options > Keyboard > Advanced > Enable Developer Console (~)
(Check this box to enable the console)
In the Library tab of Steam right click the game you want to play maps in.
Choose Properties, click Set Launch Options.
In the text area that appears type, without the quotes, "-console". Click OK.
(This technique will actually open the console when you first start the game.)
Note: different keyboard and regional settings may not correspond to your set up. For example, UK keyboards, the "¬" key in lower-case, opens the console not the "~" tilde key.
Next we need to open it.
Just press the key set for opening it. If you are not performing this action immediately after enabling it, make sure the game has fully loaded (i.e. reached the menu option) before trying to use it.
Note that enabling the console for Half-Life 2 won't automatically make it available for other games. You will have to do that in each and every game you want access to the console.
Now we need to actually give it some instructions.

To play a map you need to type, without quotes, "map mapname".
The first thing you may notice is that a dropdown list appears. This list is based on the first letter you type. I typed "g" and the list shows all the maps I have in my folder. Your list will be different; in fact it's quite possible you won't have any dropdown list.
This can either be helpful if you have forgotten the name or you can completely ignore it. The point to note here is that you need to enter the name of the file NOT the name of the map. The difference is subtle but important. You don't need to enter ".bsp".
In the screenshot, you can see the name of the file is gm_coolescape2.bsp but the name on PP is Cool Prison Escape 2.
Once you have typed the filename, press ENTER or click Submit. The console will think for a second and then disappear and the map will start.
You can use your arrow keys to select the file name, instead of typing it, press ENTER to select it.
Congratulations, you have just installed and launched a map.
How you can use the Set launch options to add the console command to a game has already been described. This concept can be extended and can be very useful. (This idea can also be used in shortcuts if you know where to add the details.)
Depending on your circumstances this can either be incredibly useful or a complete waste of time. For example you could create a Windows folder in your Programs folder which could contain shortcuts to games, each with different parameters.
There are quite a few options available.
They come in two forms; Command-line parameters and Console variables. When using them parameters come first, followed by variables.
- Enable the console: : -console
- Stop the intro videos from playing: : -novid
- Load your last quick save: : +load quick
- Set the skill level: +skill 3
- Set cheats to on: +sv_cheats 1
- Open specific maps: +map mapname
- Turn the gravity gun into a super gravity gun: +physcannon_mega_enabled 1
For more information on these and other console commands visit The Valve Developer Community website.
Section Four: Special Issues
In 2013, Valve changed the way games were downloaded, updated and stored on a users computer. This caused HUGE problems for many, many mods. Eventually, solutions for most broken mods were found and published.
Mods released after the change work but those created before, generally don't without some sort of change to a text file.
For more information, please see: